Are you moving into a new home and bringing your beloved grand piano with you? Or have you recently acquired this charming instrument to explore your musical side? No matter your scenario, there’s a challenging question that surfaces — how do you move this enormous, intricate instrument without damaging it or harming yourself?
Indeed, the process of moving a piano could make even the most experienced movers break into a sweat. And we are here to share some handy tips that will let you complete this task without much trouble.
Tip 1: Get the right equipment
The tools you have at hand can either break it or make it. That’s because the piano moving task is not as simple as picking up a chair or shifting a table. It requires a unique set of tools specifically designed for the job:
- A piano dolly. This is not your regular furniture dolly — it’s a specialized tool capable of handling the heavy weight of a piano.
- Heavy-duty straps. These will help you secure the piano to the dolly, ensuring it doesn’t wobble or fall during the move.
- Piano padding or blankets. These will protect the surface of your piano from scratches and dings during the move.
- Packing tape. With this, you’ll secure blankets or padding so that they do not fall off as you move the piano.
- Gloves. To protect your hands, don’t forget to wear gloves.
- Measuring tape. You’ll need this to figure out the dimensions of your piano.
- Soft cloth. This will help you remove dust and dirt from the piano’s surface.
- A robust ramp. If you deal with stairs on your way, this will help you move the instrument up and down.
Also, mind that sometimes carrying the piano from one place to another may require removing doors from their jambs. So, make sure you have the right set of screwdrivers or other tools you may need to do the job.
Tip 2: Prepare the piano
Here’s where things become more interesting. Because to prepare the piano, you’ve got to complete a few important steps.
Clean the piano
Give your instrument a good clean. Dust and dirt accumulated over time could scratch the piano’s surface during the move. A soft, lint-free cloth is perfect for wiping away dust without causing any harm. Also, go over the piano keys.
Measure the piano
You’ll need to know the piano’s dimensions before you move on — height, width, and depth. Why? This will help you plan the move, from figuring out the best route to ensuring it fits through doorways, hallways, and staircases at both your current location and your new home. A measuring tape is all you need for this job.
Remove and secure parts
Remove any detachable parts of the piano, such as music stands or piano legs. These pieces are often delicate and can be damaged easily during transit. Once removed, wrap them separately in bubble wrap or padded blankets for protection.
For those parts of the piano that can’t be removed, secure them. Close and lock the keyboard lid to protect the keys. If it doesn’t lock, do not use tape to keep it closed as it can damage the surface. Instead, secure it with a soft cloth or blanket.
Protect with blankets
Finally, wrap the main body of the piano in thick blankets or special piano padding. Secure the blankets with packing tape, ensuring the tape doesn’t come into contact with the piano’s surface. This extra layer of protection will act as a shield against bumps and scrapes during the move.
Tip 3: Dress for the job
Just as a pianist dresses for a performance, so too must you dress appropriately for the task of moving a piano. The right attire not only ensures comfort but also significantly reduces the risk of accidents or injuries. Here’s how to dress for success on your piano moving day.
Sturdy, closed-toe shoes. You’ll be dealing with a heavy instrument, and the last thing you want is a dropped piano foot pedal on your toe. Shoes with a non-slip sole are also a good idea, as they provide extra grip on slippery surfaces.
- Comfortable clothing that doesn’t restrict your movement. Loose-fitting clothes can get caught on corners or door handles, so lean towards outfits that are snug but stretchy. Avoid wearing long jewelry, too.
- Gloves. Choose a pair with a good grip to prevent your hands from slipping while lifting the piano. They’ll also protect your hands from splinters or sharp edges.
- Supportive gear like a back brace or knee pads. These can provide additional support and protection, especially if you’re not accustomed to heavy lifting.
Tip 4: Plan the route ahead
Moving a piano is a bit like a strategic game of chess. Knowing the route you’ll be taking the piano through allows you to anticipate any potential obstacles. You’ll be able to visualize each turn, each doorway, and each staircase that you’ll encounter. This foresight will help you adjust your grip, angle, and pace as needed for each part of the journey.
Measure doorways, staircases, and hallways. The last thing you want is to get to a doorway only to realize that your piano won’t fit through.
Tip 5: Take care of the little ones
Children and pets, curious by nature, might find the piano moving process intriguing and wish to be part of the action. However, for their safety and the smooth execution of the move, it’s better to situate them elsewhere.
If you have pets, consider placing them in their crate or confining them to a room where they won’t be in the way. The last thing you want is your furry friend underfoot while you’re maneuvering a weighty piano.
For young children, assign an adult not involved in the move to keep an eye on them. Alternatively, it could be a perfect time to organize a play date for them at a friend’s house. This way, they get to have fun, and you can focus on the task at hand without any worries.
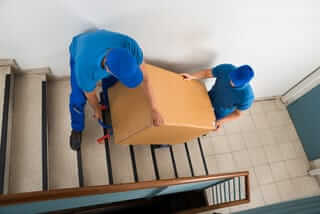
Tip 6: Stick to piano lifting techniques
Moving a piano can be traumatic. When done incorrectly, it could result in damage to the piano and serious injuries to your back or knees.
So, before you attempt to lift the piano, bend at your knees, not your waist. This technique engages your legs, which are much stronger and more capable of handling the piano’s weight than your back muscles. Also, keep your back straight and your feet shoulder-width apart to maintain balance.
With one person on each end of the piano, lift it slowly onto the piano dolly. Make sure everyone involved in the lifting process is moving in sync to prevent any sudden jerks or shifts in weight that could cause harm or damage.
As you place the piano on the dolly, ensure it’s centered and secure before attempting to move it. The last thing you want is for the piano to tip over because it was unevenly placed.
Tip 7: Do the rights things after the move
Once your piano has safely made its journey to its new home, the work isn’t quite done yet. You still need to make a few more steps to ensure your piano settles in perfectly and continues to play the sweet music you love.
Moving from one environment to another can affect the piano’s tuning. So, let it rest in its new spot for a few weeks before having it tuned.
Also, immediately assess your piano for any potential damage. Even with the utmost care, minor scuffs or scratches may occur. If you find any, reach out to a professional for advice on the best course of action to restore your piano to its former glory.
And, of course, hire a professional to tune the piano. The physical move, combined with the change in environment, can throw your piano out of tune. A professional tuner will bring it back to its melodious best.
Conclusion
If the piano moving process seems to be too daunting for you, no worries — you’re not alone. Piano relocation is a frequent request at ABA Moving and we appreciate the trust you place in us to move your cherished instrument. Our expert team, equipped with the right tools and skills, is ready to help you hit the high notes of a smooth, successful piano move.
At ABA Moving, we don’t just move your piano. We ensure it’s ready to fill your new home with beautiful music. Contact us today to learn your next steps in arranging your hassle-free piano move with our team.